The Truth About Resolution on MacBook
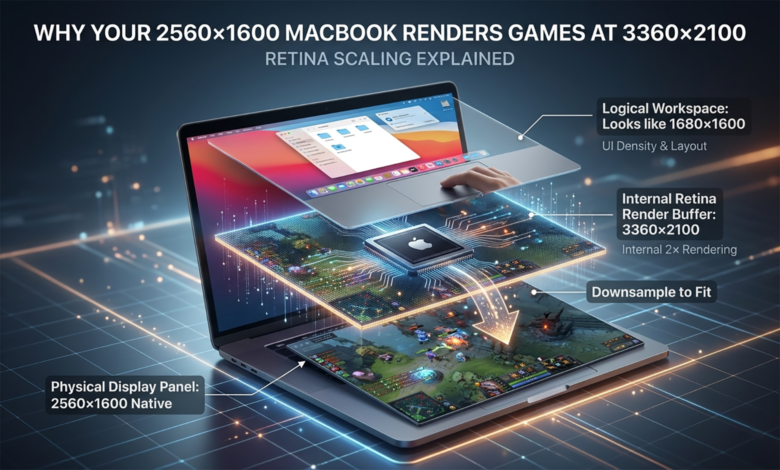
Understand why a 2560×1600 MacBook can render games at 3360×2100 and what Retina scaling is really doing behind the scenes.
Understanding MacBook Retina Scaling System
If you’ve ever fired up a game on your 13-inch MacBook Pro and noticed the resolution settings offering something like 3360×2100 when your screen is physically only 2560×1600, you’re not alone. I had the exact same experience on my MacBook Pro M2 when I first launched Dota 2 and saw resolutions that seemed impossibly high for the hardware. At first, I thought maybe there was some hidden “true resolution” mode I’d accidentally enabled, or that macOS was doing something weird or that I fundamentally misunderstood.

Turns out, I wasn’t wrong about the misunderstanding part. Apple’s Retina scaling system is both elegant and confusing, especially if you’re coming from Windows where a 1080p display runs at 1080p and that’s basically the end of the story. But on macOS, there’s a whole layer of complexity happening behind the scenes that makes display resolution far more interesting than just matching your screen’s physical pixel count.
In this article, I’ll walk through exactly what’s happening when your MacBook offers those seemingly impossible resolutions, why screenshots sometimes come out larger than your screen’s native resolution, and what all of this means for gaming performance. I’ll use the 13-inch MacBook Pro M2 as the primary example since that’s what I currently have, but the same principles apply to most modern MacBooks, including the MacBook Air M1, M3, and the newer models with the notch like the 13.6-inch and 14-inch variants.
The Physical Reality: 2560×1600 (and Nothing More)
Let’s start with the hardware. The 13-inch MacBook Pro M2 has a physical display panel with a native resolution of 2560×1600 pixels. That’s it. That’s the actual number of physical pixels built into the screen.
Golden Rule: No matter what you do in macOS, no matter what display scaling options you choose, no matter what resolution you select in a game, the screen itself is still physically 2560×1600 pixels. That hardware number never changes. It’s always 2560×1600.
This is important to understand because everything else that happens is essentially software magic layered on top of this fixed hardware reality. When you see higher resolutions available in games or when your screenshots come out at “bizarre” dimensions, the physical screen hasn’t suddenly grown more pixels. Something else is going on.
“Looks Like” Resolution
Actually, this is the user interface illusion.
So here’s where things start to get interesting. When you go into System Settings and navigate to the Displays section on a MacBook, you’ll see options like “Default for display” and “More Space” or “Larger Text“. These aren’t actually changing your screen’s resolution in the traditional sense. Instead, they’re adjusting what Apple calls the “Looks like” resolution, which is really just the logical workspace size.
For example, if you select More Space on a 13-inch MacBook Pro M2, the system typically switches to a mode that behaves as if your desktop were 1680×1050 pixels. This is the logical resolution, and it determines how much content fits on your screen, how large icons appear, and the overall density of the user interface. Think of it as the coordinate system that applications use to position windows and UI elements.
But here’s the thing that confused me for quite a long time: in most HiDPI scaling modes, macOS isn’t actually rendering your interface at 1680×1050. That would look pretty terrible on a high-resolution display. Instead, Apple does something much cleverer.
The Hidden Render Buffer: Where 3360×2100 Comes From
When you’re running in that “Looks like 1680×1050” mode, macOS typically doesn’t render the UI at that resolution directly. Instead, it performs what’s called Retina scaling. In many common HiDPI configurations, the system takes that logical 1680×1050 workspace and renders everything at exactly double the dimensions: 1680 × 1050 × 2 = 3360 × 2100 pixels.
Why Screenshots Are So Huge
Because this doubled resolution becomes the internal Retina framebuffer. Everything your computer draws, from text to icons to application windows, often gets rendered at this higher resolution first. When you take a screenshot, macOS frequently captures this internal 3360×2100 render buffer, not the physical display, which is why the image file is often much larger than your screen.
And this is also exactly why games like Dota 2 or DREDGE can offer “3360×2100” as a selectable resolution. From many game engines’ perspective, when they query the system for available resolutions, macOS may report back the backing framebuffer size. The game isn’t lying or making things up. Depending on how it accesses display information, it may genuinely see that your system has a rendering surface of 3360×2100 available.

Once everything is rendered at this high internal resolution, macOS performs one final step: it downsamples the 3360×2100 image to fit the actual 2560×1600 physical display. This downsampling is what gives Retina displays their characteristic sharpness. Text looks incredibly crisp because it’s being rendered at a much higher resolution than the screen can physically display, and then intelligently scaled down to fit.
It’s worth noting that macOS’s actual rendering pipeline is more complex and dynamic than this explanation suggests. The backing resolution can vary based on your selected scaling mode, display type, and whether applications are HiDPI-aware. Some scaling modes use different ratios, and fullscreen applications may bypass certain parts of this pipeline entirely. But this framework captures the essential concept that helps explain why you see those seemingly impossible resolutions in many common scenarios.
Why This Matters for Gaming Performance
Honestly, this entire process has significant implications for gaming on a Mac. When a game runs at 3360×2100, your GPU is genuinely processing all those pixels. Let’s put this in perspective:
- Native panel resolution: 2560×1600 ≈ 4 million pixels
- Retina render buffer: 3360×2100 ≈ 7 million pixels
The Performance Hit
Jumping from 4 million to 7 million pixels represents a massive increase in computational workload. If a game is truly rendering at 3360×2100 internally, your GPU is doing significantly more work, which explains why some games on MacBook feel heavier and hotter than expected.
This explains something I noticed immediately when gaming on my MacBook. Games looked incredibly sharp, almost unnaturally detailed, but the UI elements were tiny and my frame rates were lower than I expected for a supposedly “native” resolution. The sharpness came from the fact that the game was effectively rendering at a pseudo-3K resolution, using far more pixels than the screen could actually display. The tiny UI happened because the interface was sized for a much larger logical resolution. And the performance hit occurred because the GPU was working much harder than it would if the game were running at the screen’s actual physical resolution.

This is precisely why many Mac gamers choose to lower their resolution settings or disable Retina mode entirely when games offer that option. By selecting resolutions like 1680×1050 non-HiDPI, 1440×900, or even 1280×800, you can dramatically reduce the GPU workload. The visuals will still look reasonably sharp thanks to the high pixel density of the display, but your frame rates and thermal performance will improve significantly. On Apple Silicon Macs in particular, this can make a surprisingly big difference in how games run.
The Three-Layer Reality of MacBook Displays
The biggest realization I had while researching this was understanding that there are typically three distinct concepts at play, and they’re all independent from each other.
First, there’s the physical display panel itself at 2560×1600, which never changes. Second, there’s the macOS logical workspace, the “Looks like” resolution that determines UI density and layout, which might be 1680×1050 or 1440×900 or something else. And third, there’s the internal Retina backing framebuffer (in HiDPI modes), which is often double the logical resolution, giving you something like 3360×2100 or 2880×1800.
To make it easiest to visualize, here is how the layers break down on a standard 13-inch MacBook Pro:
| Layer | Resolution | What It Does |
|---|---|---|
| Physical Display Panel | 2560 × 1600 | The actual hardware pixels built into the screen (never changes). |
| macOS “Looks Like” Workspace | 1680 × 1050 | The logical desktop size that determines UI density, icon sizes, and layout. |
| Internal Retina Render Buffer | 3360 × 2100 | The intermediate framebuffer where macOS renders everything at 2x scale before downsampling. |
Once everything is rendered at this high internal resolution, macOS performs one final step: it downsamples the 3360×2100 image to fit the actual 2560×1600 physical display. This downsampling is what gives Retina displays their characteristic sharpness.
These three layers work together to create the final image you see on screen. Applications position their windows according to the logical resolution. In many HiDPI scaling modes, the system renders everything at the doubled Retina (backing) resolution. And finally, that high-resolution render typically gets downsampled to fit the physical panel.
Once you understand this three-layer model as a mental framework, many of the weird behaviors suddenly make sense. Screenshots are larger than the screen because they capture the backing framebuffer. Games offer seemingly impossible/high resolutions because they’re reading the backing buffer size. And “More Space” doesn’t work like Windows resolution changes because it’s adjusting the logical layer, not the physical layers.
Why Apple Does It This Way
Apple’s approach to display scaling prioritizes visual quality above everything else. Rather than doing simple 1:1 pixel mapping like Windows traditionally does, macOS in HiDPI modes renders everything at a higher resolution and then intelligently downsamples to the display. This ensures that text is always crisp, UI elements have smooth edges, and the overall visual experience feels premium regardless of what scaling mode you choose.
The trade-off, of course, is complexity. It’s not immediately obvious what resolution your system is “actually” running at because there are multiple valid answers depending on which layer you’re asking about and what scaling mode you’re using. For power users and gamers, this can be frustrating because it makes performance optimization less straightforward. But for the average user who just wants things to look good, it works remarkably well.
This is also why macOS display scaling behaves so differently from Windows. On Windows, if you change your display resolution, you’re typically changing all three layers at once. Your physical display stays the same, but the rendered image changes and Windows stretches or compresses it to fit. On macOS, the physical display is always at native resolution, and what changes is the relationship between the logical workspace and the internal backing buffer.
What This Means for You
If you’re a Mac user who’s been confused by display resolutions, the key thing to remember here is that “Looks like” resolution is not the same as actual render resolution, and neither one necessarily matches your physical display. When you select “Looks like 1680×1050,” you’re not running your screen at 1680×1050. You’re typically running a logical workspace that size, rendering at 3360×2100, and displaying at 2560×1600.
For gamers, this understanding is particularly valuable. If you’re seeing performance issues in games, try selecting a lower resolution or disabling HiDPI mode if the game offers that option. You’ll sacrifice some visual sharpness, but the frame rate improvements can be substantial. And remember that those high resolution options in game settings aren’t fake or broken. They’re genuinely rendering at those resolutions, which is why they’re so demanding on your GPU.
For everyone else, this mostly just explains why macOS sometimes feels like it’s doing its own thing with displays. Apple’s Retina scaling system is genuinely clever, and once you understand how it works, you can appreciate why screenshots sometimes have unexpected dimensions, why external displays sometimes behave in surprising ways, and why your MacBook’s display looks so much sharper than other laptops with similar resolution specs.
Now that you see, the system makes a lot more sense once you know what’s happening under the hood, even if it takes a bit of mental adjustment if you’re coming from the more straightforward world of Windows display management.
Enjoyed the article?
![]()